Kite.
Kites are the nicest fun at the end of summer and early autumn. Of course, the greatest satisfaction comes from testing with a self-made model. A seven-year-old child, with a little help from his parents, can make the simplest model of a kite. Later, as you gain experience, skills and proficiency, will construct increasingly complex and intricate models.

Flat kites are the easiest, two-slat. The materials needed to make them are: thin pine slats of appropriate length, kite wrapping paper (tissue, parchment, tracing paper, thin wrapping paper or wallpaper), wood and paper glue and strong threads (sewing threads are the best). Of the tools will be needed: a sharp knife or a small saw for wood or metal, scissors, line, a set square and a pencil.
First, we prepare the skeleton of the kite.
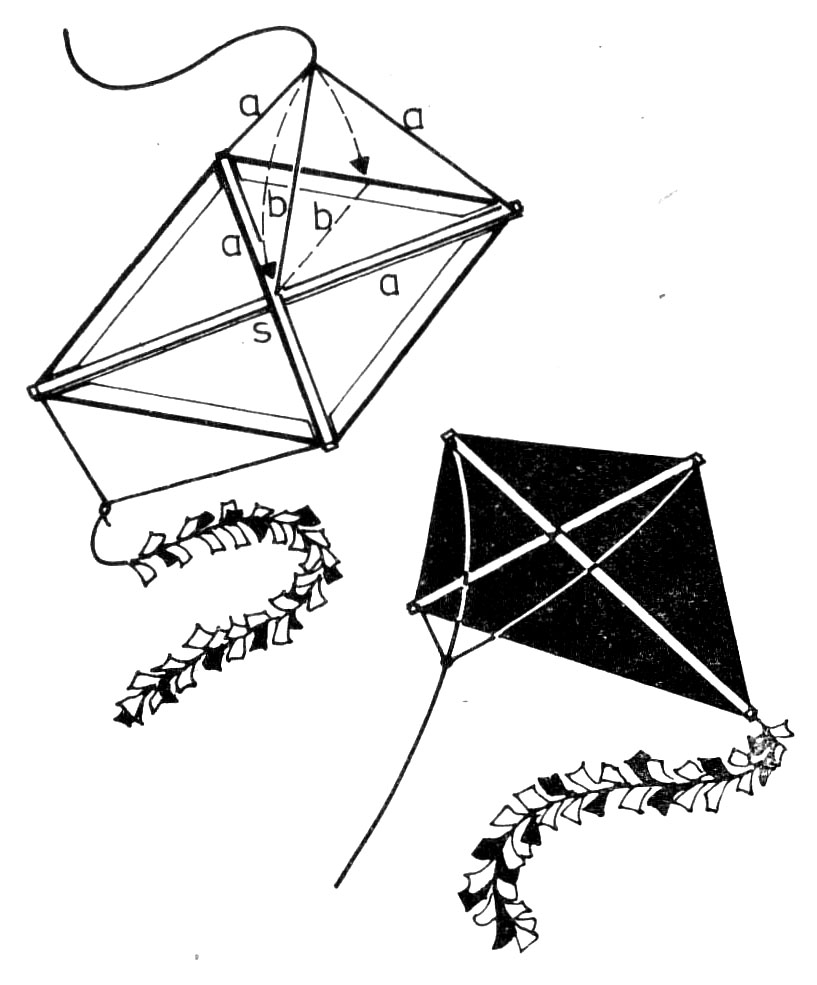
The two-slat model can be square or diamond-shaped. Make small cuts at the ends of the slats with a sharp knife or saw. Then we cross the slats, we check, if they are arranged at right angles and glued, and to strengthen the construction - tie with a thread. Now we're doing the edging: put the thread in the cuts of the slats, pull tight and tie with a flat knot. So that the thread does not move, we lubricate the cuts with glue. Now we cut the paper for wrapping the kite. Tracing paper is the best, but a small kite can also be wrapped with a thin one, colorful, double folded tissue paper. Surface- of paper should be slightly larger than the frame, so that after gluing to the slats, it can be bent after approx 1 cm on each side and glue around the thread. The next step is to prepare the tail. We make it from narrow strips of tissue paper tied with string. The method of binding is shown in the drawing.

When the glue dries well, we proceed to a very important activity - putting on a bridle. In a square kite, we tie a thread to a slat in one corner, and its free end we lead along the slat to the middle, here we hold it with a finger, and the rest of it we lead to the next corner and tie it tightly. Now we check, whether the center of the thread coincides with the center of the kite after the thread is tightened. If the attempt was unsuccessful, cut the thread and tie a new one, for the bridle must be fitted correctly. If the attempt is successful, tie a meter long piece of thread to the intersection of the slats in the middle of the kite, then we connect it with the thread attached previously. The knot connecting both threads should be in such a place, so that when the middle thread is tightened, it touches the edge of the kite or its center.
If it falls out of bounds, or does not reach it, it has to be untied and tied again. An incorrectly installed bridle prevents the kite from flying evenly and calmly. So we check again, that it is properly tied and attach a tow rope to it. Now you have to put on the second bridle, to which we attach the tail. This activity is much easier. We tie the thread to the other two corners of the kite, and in the middle of it we tie a loop for putting on the tail. It is important to, so that the loop is exactly in the center of the tied thread. With the kite prepared in this way, you can make your first flight attempts.
With a rhombic kite, we attach the bridle a bit differently. We tie one thread at the front to the end of the longitudinal slat, and the other two to the ends of the cross slat. The thread binding site should fall on the front corner of the kite. We fasten the tail without a bridle, directly to the end of the elongated slat.