Model train.
If a child wants to use a toy he made himself, let's encourage, to try to make a model train that requires a little more effort, but for that, which can be used for many different activities, namely, a matchbox train.
Materials needed for DIY: lots of empty matchboxes, colored wrapping paper, pieces of bristol, cardboard or cardboard, paints or colored ink, pieces of wire approx 1 mm and thinner, neither, good paper glue. Essential tools: compass, line, pencil, scissors, pliers for cutting and bending wire, a skewer for making holes.

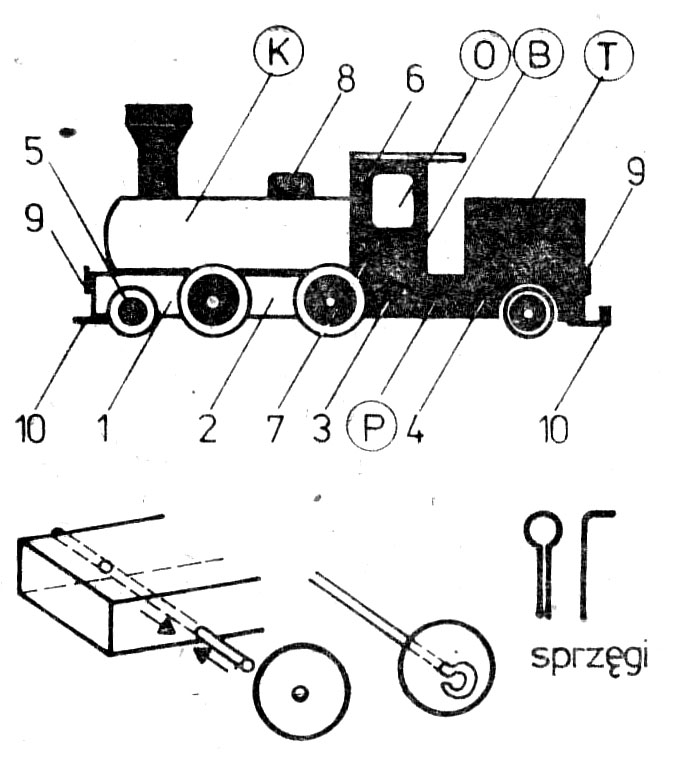
Needed to make a steam locomotive 10 whole boxes and two "drawers". First we do (see drawing) chassis (P) locomotive, on which we will set the tender (T), cauldron (K) and a driver's booth (B). We will make the chassis from 4 boxes by connecting them with half-extended drawers (1-2, 3—4), one of the drawers will protrude in front of the locomotive's front wheels (5). We will glue the drawers arranged in this way to the boxes. Cauldron (K) we will do with 4 boxes, to which we will attach the driver's booth - two drawers marked with numbers 6 i 7. Drawer marked with a number 7 has a cut bottom, making the booth deeper. We will make the roof of the booth from a piece of cardboard. And finally, we glue the tender to the chassis, consisting of two boxes.
We will cover the whole locomotive with black glossy paper. We will stick two white windows on both sides of the booth (O). Arrived (greater) and a sandbox (8) we make from pieces of cork and glue or fasten with pins. Front and rear lanterns (white small discs) glue in the places marked with the number 9.
There is still work to be done 8 wheels (4 larger with a diameter of approx 1,5 cm i 4 smaller diameter of approx 1 cm). We cut them out of thick and stiff cardboard and paint them with black paint. It is worth making red rims of the wheels, just like real steam locomotives. We will attach the wheels to the chassis of the steam locomotive using 6-centimeter pieces of copper wire. With a sharp skewer, we make holes in the box and pass the wire through them like this, as the picture shows. Then we put on the circles and wind the ends of the wires in this way, make sure that the wheels are secure and can turn freely. Now we're going to make the couplings, used to connect wagons. We can make them out of wire, as shown in the picture and attach the hook in the center of the chassis on one side, and a loop on the other.